5600/7600 Series Insulated Glass Vent Handle Field Replacement Kit Installation Instructions
These instructions are for guidance only. This kit is provided for your convenience to attempt the replacement of a vent handle without removing the RV window from the RV or Motor Home. It is recommended that an experienced after-market RV technician perform the installation, however, if these instructions are reviewed before beginning and are carefully followed, your replacement should be relatively easy. Pelland Enterprises and/or Hehr International can assume no liability for damages as a result of attempting this replacement procedure.
Read and understand these instructions before beginning.
Correct placement of the two-faced tape and handle is critical to the proper operation of the window. Once the handle is attached using the supplied two-faced tape it will not be possible to remove it and make a second attempt.
CAUTION: Although glass breakage is unlikely, safety glasses and gloves should be worn during steps 3 & 15.
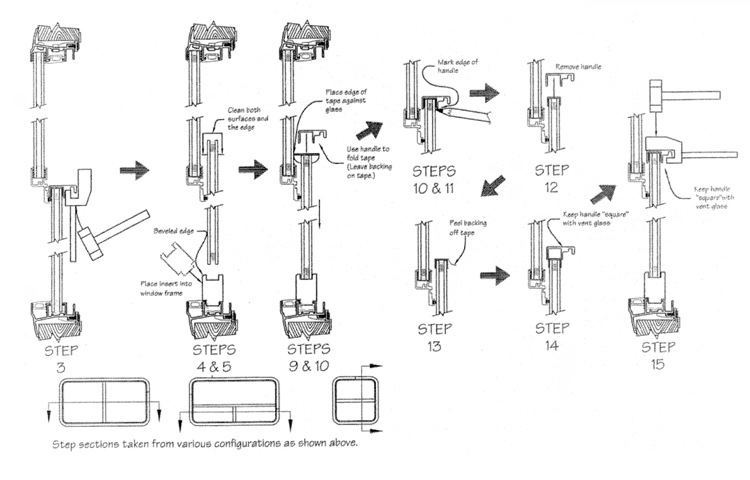
The instructions below and drawing attached are typical for several different window models. The sketches at the bottom of the attached drawing show how these views represent each configuration. The attached drawing illustrates several of the steps below. Refer to these drawings as you read these instructions. Where necessary, the instructions below will identify any differences between models using symbols: Half slider = H-S, "T" slider = T-S, Vertical slider = V-L.
The kit you receive may include a replacement handle. If this is so, use this new handle when following step 7 and above.
- Open vent fully
- Remove the screen from the RV window. Hehr screens are spring loaded to prevent unwanted movement an rattles. To remove the scree, the springs must be compressed and the screen popped out. (A) - H-S & T-S: Lift the screen by pushing upwards at the top of the screen until the bottom of the screen clears the RV window frame. Remove and set aside. (B) - V-L: push the screen to the left or right until the opposite side clears the RV window frame. Remove and set aside.
- If the original handle is still attached to the vent glass, it must be removed. (A) - H-S & T-S: Place pounding block against the handle near the bottom of the vent and drive the Handle of the glass using a mallet or hammer. (B) - V-L: Place pounding block against underside of handle at either end of the vent and drive handle up and off glass using a mallet or hammer. Open vent. Duct tape may be applied to the center area of the vent glass to assist in opening.
- Place spacer block into RV window frame vent channel as shown (this is a snug fit so it may need to be tapped into position), and close vent against the spacer block. Be sure that the beveled edge of the insert is towards the exterior of the RV or Motor Home as shown.
- Clean vent glass surfaces along edge where handle will be attached. Use of isopropyl alcohol is recommended, however over the counter glass cleaner can be used if the surfaces are re-wiped using a cloth dampened with clear water to remove any remaining film. Ensure that the back surface of the vent glass is cleaned as well as the inner surface.
- Use a #2 cross-recess screwdriver to remove the latch from the original handle and set aside.
- Place the handle over the edge of the vent glass and center it between the RV window frame sides. Use a grease pencil on the inside surface of the vent glass to accurately mark the ends of the handle. Remove handle.
- Cut the supplied two-faced tape to the same length as the handle. Avoid touching the sticky surface of the tape.
- Place tape (sticky side against glass) on the edge of the vent such that the back edge of the tape just touches the stationary glass pane. This will ensure that the tape is centered across the thickness of the vent. Be sure the tape is positioned between the marks made in step 7 above. Push the tape firmly against the edge of the vent glass. Do not attempt to fold the tape onto the flat surfaces of the vent. Do not remove the plastic backing from the tape at this time.
- Positioning the handle as shown, push the handle the rest of the way onto the vent folding the tape onto the glass surfaces as you go. Push the handle onto the vent evenly along its entire length to avoid creasing the tape. Be sure the handle is fully seated on the vent.
- Place a grease pencil mark on the glass along the long edge of the handle. This mark will be used to ensure that the handle is fully seated in a later step.
- remove the handle. Since the backing is still on the tape at this point, the handle will easily pull off by hand.
- Beginning at on end, remove the plastic backing from the tape. Remove the backing carefully to avoid pulling the tape off the back surface of the glass.
- Making sure to center the handle along the tape, position the handle against the edge of the vent glass as show and push onto the glass as far as possible by hand.
- Slip the pounding block onto the handle, using a mallet or hammer, drive the handle onto the glass. Slide the pounding block along the length of the handle as you work to avoid bending the handle. The handle is a press fit onto the vent and will require considerable effort to become fully seated against the vent glass. It is critical that the handle be fully seated to permit the latch to properly engage when the vent is closed. Use the long pencil mark from step 11 to determine whether or not the handle is fully seated before proceeding.
- Remove the pounding and spacer blocks and close vent.
- Hold the latch (removed in step 5) in position against the handle an ensure that the latch handle can be rotated to the closed position. Partially inserting the latch screws may be helpful to ensure that the latch is properly positioned.
- Reinsert the spacer block and repeat step 15 as necessary to drive the handle sufficiently onto the vent to permit the latch to be operated.
- Use a #2 cross-recess screwdriver to reattach the latch to the handle using the original screws.
- Open and close the vent several time to verify proper operation of both vent and vent latch.